Saving as separate images will save each frame as a separate image file. This can be useful if you want to use individual images on web pages or if you prefer to compile the images into a video or other file format using other software. The Image options allow you to export in four popular image formats. The resulting image file names will be given a suffix based on their frame number in the animation. A new folder will automatically be created to store the images in if 'Create Folder' is selected.
Click 'Export Animation' in the File menu, select 'Separate Images' from the sub menu, specify a file name and click 'Save' to display the Export as Images options window and save. After setting the options, click 'Export' and wait for the progress bar to reach the end.
Image export options
Image Format
PNG - A compressed but lossless image format. This is the preferred pixel based format as there is no reduction in quality but results in a relatively small file size.
JPEG - A compressed and lossy image format normally used for photos. This may be the preferred format if photos are used for backgrounds or sprites and you want to minimise file size.
GIF - A compressed and lossy image format normally used for simple graphics, which only supports 256 colours but results in a small file size if the animation contains few colours.
SVG - Scalable Vector Graphics format. This format is based on a description of the objects rather than pixels. The result can be scaled to any size without loss of quality. SVG files can be viewed in most web browsers or edited in a vector graphics software such as
Inkscape. The files are
XML based and so can even be edited in a text editor. This is the best format to use if designing artwork using Pivot. If background or sprite images are included in the frames, then they will be saved in a folder and linked to from the SVG file.
Quality
The JPEG quality with 100% being best quality and largest file size. This option is only enabled if JPEG is selected as the Image Format.
Height
The Height option allows you to specify the dimensions of the resulting images. Leave the value as default if you want the resulting images to have the same dimensions as your animation.
Create Folder
When enabled, a folder will be automatically created for you and the exported image placed in it. When disabled, the images will be saved directly to the save location. It is better to leave Create Folder selected to reduce clutter in the save location.
Smooth Edges
Select an option from the drop-down list. When set to
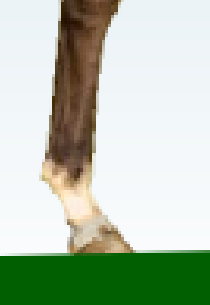
Smooth Edges, the figures will have smooth
anti-aliased edges as they do when editing, although
sprites may still not appear smooth. When set to
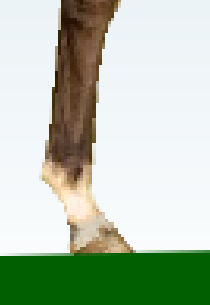
No Smoothing, the figures will have jagged edges and appear pixelated. Most of the time you will want Smooth Edges enabled. However, setting to No Smoothing may be useful if you want a more retro look, want to reduce file size or because you want to fill areas after exporting. When set to
Smooth Sprites all figures and
sprites will appear smooth. This setting uses
super-sampling and so takes longer to export. There is no advantage to using Smooth Sprites if your animation does not use sprites.
No Smoothing Smooth Edges Smooth Sprites
Smoothing options, showing a zoomed in section of a line segment (ground) and sprite (horse leg)
Transparency
All image formats apart from JPEG can be exported with transparent regions so that they can be overlaid onto other components of web pages while allowing the areas behind to be seen. Firstly set the background of the animation to solid transparent using the
background colour editor. Set the opacity to 0 when selecting the colour. Now when you export the animation as separate images the visible areas of background will be transparent.
If semi transparent backgrounds or figures are used then they will appear correctly as semi transparent over any objects behind.