Basic Pose and Movement
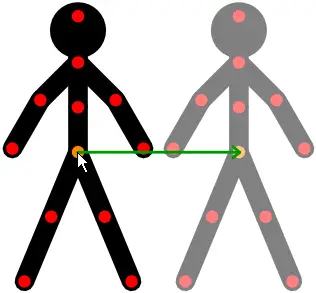
A figure consists of 'segments' (lines, circles or images) connected in a treelike structure by pivoting joints. Click and drag the red handle at the end of each segment with the mouse cursor to rotate it around its pivot and all the segments connected to it. Click and drag the orange 'origin' handle to move the whole figure. In this way you can easily adjust the pose of a figure to any position you want while keeping the proportions of the figure constant.
When unselected, all figure handles will be displayed in blue. A figure can be selected by clicking on it anywhere. Rotating the mouse wheel while holding down the Ctrl key will also change the selected figure.
Drag the orange handle of a figure to move the whole figure
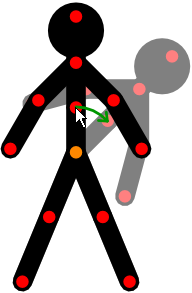
Drag a red handle with the left mouse button to rotate the segment it's at the end of and all segment attached to it
Positioning Toolbar
The positioning toolbar provides several options for positioning segments and figures in various ways without the need to use keyboard shortcuts while dragging handles. The toolbar can be shown at the top of the animation or figure builder canvas by clicking the small down arrow at the top of the canvas. Clicking the up arrow on the left hand side of the toolbar will hide it again. The toolbar can also be positioned to the left, centre or right of the canvas by clicking the arrow on the right hand side.
Positioning toolbar with the snap option enabled
Note that hovering the cursor over a button will show a tool tip with a short description of the button and the alternative keyboard shortcut that can be use for that feature.
Fine Positioning Using the Arrow Keys
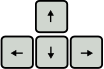
Figures can also be positioned accurately by using the arrow keys to move the selected figure or figures in 1 pixel increments. If the cursor is positioned over a red handle, then this will have the affect of rotating the segment in 1 pixel increments instead of moving the whole figure. The cursor won't move with the handle, but the arrow keys will continue to move that segment until the cursor is moved.
Even finer positioning using the arrow keys can be achieved by first
zooming in. For example, zooming to 400% and pressing an arrow key to move a figure is equivalent to moving the figure by a quarter pixel.
Lock to Horizontal / Vertical Movement
Figures can be moved only horizontally or only vertically by holding the Ctrl key while starting to dragging the figure's orange origin handle. The direction is determined by the initial drag direction. The same trick can be used with the
virtual camera's orange position handle.
Reset Figure Pose to Default
This option is in the Edit menu and makes it possible to restore the selected figure or figures to their default pose. This is the pose that the figure was built with and is the pose that the figure has when you first add it to the animation from the figure selector or figure builder. This will reset all segment angles, bend angles and segment lengths to their defaults. Note that it will not affect the figure's position on the canvas or its scale. The keyboard shortcut is Ctrl+Alt+P.